フリーで使える、Let's Encrypt を導入してみました。
CentOSのVPSでやってみました。導入したドメインは、https://tomoplanning.asia です。
ソースコードをgithubから取ってきます。
# git clone https://github.com/letsencrypt/letsencrypt
Initialized empty Git repository in /root/letsencrypt/.git/
remote: Counting objects: 30410, done.
remote: Compressing objects: 100% (123/123), done.
remote: Total 30410 (delta 80), reused 0 (delta 0), pack-reused 30287
Receiving objects: 100% (30410/30410), 7.94 MiB | 1.99 MiB/s, done.
Resolving deltas: 100% (21469/21469), done.
フォルダができているので、そこにカレントをうつします。
# cd letsencrypt
以下を実行します。
なんだこれ? ヘルプ表示なんて不要ではということで省略しないこと。単なるヘルプの表示だけでなく初期設定が行われます。
# ./letsencrypt-auto --help
利用するドメイン(ここでは、tomoplanning.asia)を指定して実行します。
# ./letsencrypt-auto certonly -a standalone -d tomoplanning.asia
     :
最初に実行すると、必要なパッケージがインストールされます。
また、以下のようなPythonの警告が出ますが、警告だけですので気にしなくていいです。
DEPRECATION: Python 2.6 is no longer supported by the Python core team, please upgrade your Python. A future version of pip will drop support for Python 2.6
:
Loaded plugins: fastestmirror, security
Setting up Install Process
Loading mirror speeds from cached hostfile
* base: ftp.tsukuba.wide.ad.jp
* epel: mirrors.hustunique.com
* extras: ftp.tsukuba.wide.ad.jp
* updates: ftp.tsukuba.wide.ad.jp
Resolving Dependencies
--> Running transaction check
---> Package mod_ssl.x86_64 1:2.2.15-45.el6.centos will be updated
---> Package mod_ssl.x86_64 1:2.2.15-47.el6.centos.1 will be an update
--> Processing Dependency: httpd = 2.2.15-47.el6.centos.1 for package: 1:mod_ssl-2.2.15-47.el6.centos.1.x86_64
--> Running transaction check
---> Package httpd.x86_64 0:2.2.15-45.el6.centos will be updated
---> Package httpd.x86_64 0:2.2.15-47.el6.centos.1 will be an update
--> Processing Dependency: httpd-tools = 2.2.15-47.el6.centos.1 for package: httpd-2.2.15-47.el6.centos.1.x86_64
--> Running transaction check
---> Package httpd-tools.x86_64 0:2.2.15-45.el6.centos will be updated
---> Package httpd-tools.x86_64 0:2.2.15-47.el6.centos.1 will be an update
--> Finished Dependency Resolution
Dependencies Resolved
=============================================================================================================================================
Package Arch Version Repository Size
=============================================================================================================================================
Updating:
mod_ssl x86_64 1:2.2.15-47.el6.centos.1 updates 95 k
Updating for dependencies:
httpd x86_64 2.2.15-47.el6.centos.1 updates 830 k
httpd-tools x86_64 2.2.15-47.el6.centos.1 updates 77 k
Transaction Summary
=============================================================================================================================================
Upgrade 3 Package(s)
Total download size: 1.0 M
Downloading Packages:
(1/3): httpd-2.2.15-47.el6.centos.1.x86_64.rpm | 830 kB 00:00
(2/3): httpd-tools-2.2.15-47.el6.centos.1.x86_64.rpm | 77 kB 00:00
(3/3): mod_ssl-2.2.15-47.el6.centos.1.x86_64.rpm | 95 kB 00:00
---------------------------------------------------------------------------------------------------------------------------------------------
Total 6.4 MB/s | 1.0 MB 00:00
Running rpm_check_debug
Running Transaction Test
Transaction Test Succeeded
Running Transaction
Updating : httpd-tools-2.2.15-47.el6.centos.1.x86_64 1/6
Updating : httpd-2.2.15-47.el6.centos.1.x86_64 2/6
Updating : 1:mod_ssl-2.2.15-47.el6.centos.1.x86_64 3/6
:
メールアドレスの入力をします。
同意書の画面で、同意をします。
最後に以下の表示が出ます。
:
IMPORTANT NOTES:
- If you lose your account credentials, you can recover through
e-mails sent to tomoac@me.com.
- Your account credentials have been saved in your Let's Encrypt
configuration directory at /etc/letsencrypt. You should make a
secure backup of this folder now. This configuration directory will
also contain certificates and private keys obtained by Let's
Encrypt so making regular backups of this folder is ideal.
証明書ファイルができているかどうか、確認します。
(注) 証明書は、カレントのフォルダではなく、"/etc" の下です。私は、カレントのフォルダだと思って、みてもできていないので悩みました。
# ls -l /etc/letsencrypt/live/tomoplanning.asia
total 0
lrwxrwxrwx 1 root root 41 Feb  6 14:27 cert.pem -> ../../archive/tomoplanning.asia/cert1.pem
lrwxrwxrwx 1 root root 42 Feb  6 14:27 chain.pem -> ../../archive/tomoplanning.asia/chain1.pem
lrwxrwxrwx 1 root root 46 Feb  6 14:27 fullchain.pem -> ../../archive/tomoplanning.asia/fullchain1.pem
lrwxrwxrwx 1 root root 44 Feb  6 14:27 privkey.pem -> ../../archive/tomoplanning.asia/privkey1.pem
以下のようにSSLの設定を追加して、httpdの再起動します。
<VirtualHost XXX.XXX.XXX.XXX:443>
  SSLEngine on
  SSLCertificateFile /etc/letsencrypt/live/tomoplanning.asia/cert.pem
  SSLCertificateKeyFile /etc/letsencrypt/live/tomoplanning.asia/privkey.pem
  SSLCertificateChainFile /etc/letsencrypt/live/tomoplanning.asia/chain.pem
        :
</VirtualHost>
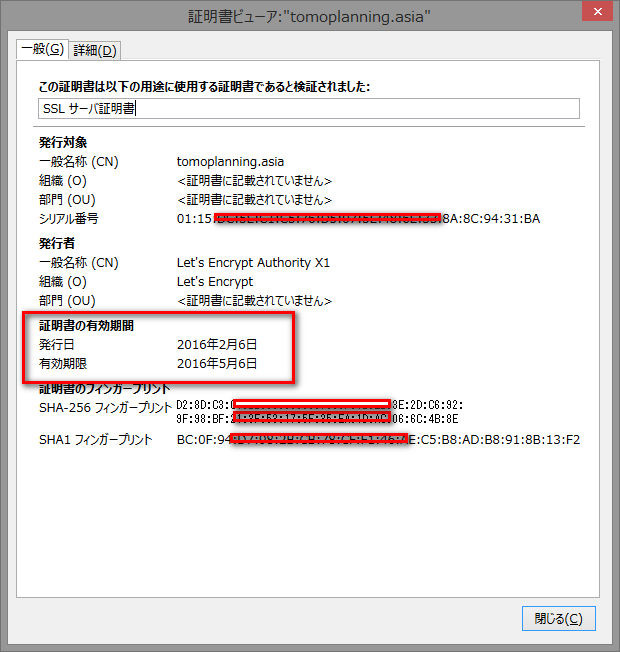
証明書を開いてみました。発行日は、2月6日で有効期限が5月6日だから3か月ですね。3ヶ月毎に更新が必要なようです。